 Jest to mój pierwszy SBS (Krok po Kroku) o malowaniu, więc nie jest on zbyt dokładny tym bardziej, iż jest to moja pierwsza figura, którą malowałem aerografem, więc byłem troszkę zaaferowany pracą i nie robiłem zbyt dużo zdjęć w jej trakcie. Zatem do rzeczy.
 This is my first SBS (Step by Step) on how to paint figure so it is not so exact as it could be also this is my first figure I will paint with an airbrush. I got so exited during painting process and that’s why I did make to many photos during the process.
Figurka wykonana w całości z żywicy została przeze mnie oczyszczona z nadlewek i wstępnie poskładana. Jednak przed jej sklejeniem najpierw wywierciłem otwory i wzmocniłem miejsca mocowania drutem miedzianym. Ostrze miecza wykonane z żywicy było bardzo krzywe i nie najładniej wykonane, więc wymieniłem je na wyfrezowane ze stali nierdzewnej. Po zaszpachlowaniu miejsc łączenia i ich wyszlifowaniu całość została pomalowana podkładem Mr. Resin Surfacer.
Figure is made entirely out of resin. I cleaned it from any mold release residue that could have still been on the figure just by washing it in the water with dish detergent. However, before gluing I reinforced the connection points by drilling holes and gluing copper wire inside. Blade was made of resin and was very misshaped so I replaced it with one maid out of stainless steel. After assembly I filled all the gaps and sanded the whole figure to prepare it for surface. Then I primed it with Mr. Resin Surfacer. 


Malowanie figury rozpocząłem od jasnych kolorów - w tym celu wykorzystałem kolor Interior Color (223) firmy Gaianotes.
I started painting figure from the brightest color - for this purpose, I used Interior Color (223) from Gaianotes Company. 
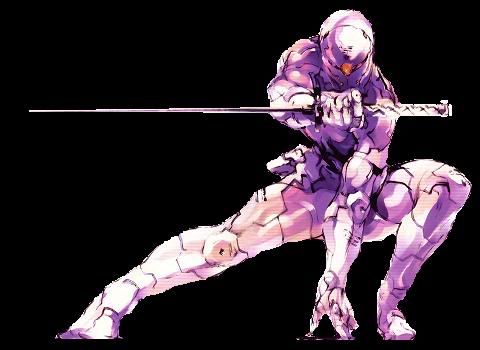
Po wyschnięciu koloru bazowego rozpocząłem robić rozjaśnienia najpierw mieszanką 1:1 kolorów Interior Color (223) i Frat White (011), a następnie kolorem Frat White (011) pokrywając tylko najbardziej naświetlone miejsca. Przyciemnianie zacząłem od dodania do bazowego koloru Interior Color (223) odrobiny Sileni Gray (303). Po wyschnięciu całość zabezpieczyłem sidoluxem.
After drying, the base color was brightened with Frat White (011) at first in a mix of 1:1. Highest and most lightened areas where then painted with color Frat White (011).Then I began to darken the base color by adding to Interior Color (223) a bit of Silent Gray (303) and painting only the shadowed areas. After drying I sealed it with Dullocout from Testors.
After drying, the base color was brightened with Frat White (011) at first in a mix of 1:1. Highest and most lightened areas where then painted with color Frat White (011).Then I began to darken the base color by adding to Interior Color (223) a bit of Silent Gray (303) and painting only the shadowed areas. After drying I sealed it with Dullocout from Testors.


Przed malowniem kolejnym kolorem zamaskowałem jasne elementy.
Bazę koloru pomarańczowego uzyskałem poprzez zmieszanie Daidai Orange (015) oraz Orange Yellow (025). Żeby stonować kolor - by nie był tak krzykliwy - dodałem odrobinę Dunkel Gelb (201). Mając gotowy kolor pomalowałem wszystkie miejsca, które powinny być pomarańczowe równomierną i jednolitą warstwą uzyskanej mieszanki. W celu zrobienia rozjaśnień, do bazowego koloru dodawałem stopniowo Notes Flesh (051) pokrywając coraz to mniejsze powierzchnie podstawowego pomarańczowego koloru. Cienie pomarańczowych elementów zostały wykonane przez dodanie odrobiny Rot Braun (203) do podstawowego koloru. Całość ponownie zabezpieczyłem sidoluxem i zdjąłem maskowanie.
Before I applied next color I masked ale the areas that needed to be white. The base orange color was obtained by mixing Daidai Orange (015) and Orange Yellow (025). To tone down the color – so it want stand out so much - I added a little of Dunkel Gelb (201). After mixing the color I painted all the places that should be orange with an even layer. In order to make the highlights to the base color I gradually added a Notes Flesh (051) each time covering smaller areas of the areas that would receive more light. Shades of orange parts were made by adding a little Rot Braun (203) to the basic color this time painting shadowed places. Again I sealed it with dullcout and took of the masking.
Before I applied next color I masked ale the areas that needed to be white. The base orange color was obtained by mixing Daidai Orange (015) and Orange Yellow (025). To tone down the color – so it want stand out so much - I added a little of Dunkel Gelb (201). After mixing the color I painted all the places that should be orange with an even layer. In order to make the highlights to the base color I gradually added a Notes Flesh (051) each time covering smaller areas of the areas that would receive more light. Shades of orange parts were made by adding a little Rot Braun (203) to the basic color this time painting shadowed places. Again I sealed it with dullcout and took of the masking.


Po ponownym zamaskowaniu wszystkich wcześniej pomalowanych elementów, przygotowałem bazowy kolor na szaro-niebieskie elementy pancerza, poprzez zmieszanie Sileni Gray (303) i ciemno niebieskiego z serii limitowanej uniformów szkolnych. Rozjaśnienia zostały zrobione przez stopniowe dodawanie koloru Frat White (011), a przyciemnienia poprzez dodanie większej ilości koloru ciemno niebieskiego do bazowej mieszanki. Całość zabezpieczyłem ponownie sidoluxem i zdjąłem maskowanie.
Once again I mask all the areas that suppose to be white and orange and prepare the base color to gray-blue elements of the suit. For that I mix Silent Gray (303) and dark blue color from the Gaianotes limited school uniforms series. Highlights were made by gradually adding color Frat White (011) and shadows by simply adding more dark blue in to the base mixture. Entire figure was sealed again with Dullcot and masking was removed.
Once again I mask all the areas that suppose to be white and orange and prepare the base color to gray-blue elements of the suit. For that I mix Silent Gray (303) and dark blue color from the Gaianotes limited school uniforms series. Highlights were made by gradually adding color Frat White (011) and shadows by simply adding more dark blue in to the base mixture. Entire figure was sealed again with Dullcot and masking was removed.


Śruby zostały pomalowane odpowiednio czerwonym Gory Red Vallejo (11) Game Color oraz Neutral Grey Vellejo (70992) Model Color. Nadszedł czas na odznaczenie linii podziału paneli - w tym celu przygotowałem mieszankę czarnej farby matowej Black Vallejo (950) Model Color, Dryling Retarder Vellejo (597) Model Color oraz wody. Całą figurę pomalowałem w zagłębieniach przy użyciu pędzla.
Screws were painted with Gory Red Vallejo (11) Game Color and Neutral Grey Vallejo (70,992) Color Model. It is time to make panel lines stand out a bit – for this purpose I prepared a mixture of Vallejo Black (950), Retarder Dryling Vallejo (597) and water. When the mix is prepared I paint entire figure in the recesses with a brush.
Screws were painted with Gory Red Vallejo (11) Game Color and Neutral Grey Vallejo (70,992) Color Model. It is time to make panel lines stand out a bit – for this purpose I prepared a mixture of Vallejo Black (950), Retarder Dryling Vallejo (597) and water. When the mix is prepared I paint entire figure in the recesses with a brush.


Całość na koniec zabezpieczyłem i pokryłem lakierem Satynowym firmy Testors. Teraz nadszedł czas na dodatki.
Ładownica była pomalowana kolorem Frat Black (012), a następnie rozjaśniona poprzez dodanie do bazowego koloru stopniowo coraz więcej Frat White (011). Następnie zamaskowałem elementy czarne i pomalowałem bazowym kolorem piaskowym Dunkel Gelb (201), a rozjaśnienia uzyskałem poprzez dodawanie coraz to większych ilości Frat White (011). Po zdjęciu maskowania całość zabezpieczyłem sidoluxem.
Rękojeść miecza została pomalowana mieszanką Light Stainless Silver (1001) i Frat Black (012), rozjaśnienia zostały pomalowane Ligot Stainless Silver (1001). Garda natomiast była pomalowana mieszkanką Złotego (94 Revell’a) i Gloss Black (Model Master), rozjaśnienia czystą farbą złotą (94 Revell’a). Całość zabezpieczona sidoluxem. Podobnie jak w przypadku figury, zagłębienia i miejsca podziału zostały pomalowane mieszanką Black Vallejo (950) Model Color, Dryling Retarder Vellejo (597) Model Color oraz wody.
After everything dries I sealed it with Testors Satin Varnish. Now it's time for extras. Pouch was painted with Frat Black (012) and then brightened by gradually adding to the base color Frat White (011). Then I masked of elements that needed to stay black and painted the rest with Dunkel Gelb (201), which was then highlighted by adding Frat White (011). After removing the masking tape every thing was again sealed with with Testors Dullcoute. Sword hilt was painted with a mix of Light Stainless Silver (1001) and the Frat Black (012), and then highlighted with Ligot Stainless Silver (1001). Mix of Gold (94 Revell) and Gloss Black (Model Master) was used to paint the hilt protection. After that highlights were made with pure Gold (94 Revell). Once again everything was sealed with Testors Dullcout. Just like on the figure recess were painted a mixture of Vallejo Black (950), Retarder Dryling Vallejo (597) and water.
After everything dries I sealed it with Testors Satin Varnish. Now it's time for extras. Pouch was painted with Frat Black (012) and then brightened by gradually adding to the base color Frat White (011). Then I masked of elements that needed to stay black and painted the rest with Dunkel Gelb (201), which was then highlighted by adding Frat White (011). After removing the masking tape every thing was again sealed with with Testors Dullcoute. Sword hilt was painted with a mix of Light Stainless Silver (1001) and the Frat Black (012), and then highlighted with Ligot Stainless Silver (1001). Mix of Gold (94 Revell) and Gloss Black (Model Master) was used to paint the hilt protection. After that highlights were made with pure Gold (94 Revell). Once again everything was sealed with Testors Dullcout. Just like on the figure recess were painted a mixture of Vallejo Black (950), Retarder Dryling Vallejo (597) and water.

Przewód łączący rękojeść miecza z ładownicą po pokryciu podkładem został pomalowany bardzo rzadką farbą Black Vallejo (950) Model Color, a następnie z aerografu farbą Smoke (X-19) firmy Tamiya. „Oko” natomiast zostało pomalowane kolorem Clear Red firmy Humbrol (stara seria). Całość elementów została poskładana i sklejona w całość.
Cable connecting swords handle and pouch was painted with primer paint and then with highly thinned Vallejo Black (950) Model Color. After this dried cable was painted with Tamiya’s Smoke (X-19). "The Eye" was painted with Humbrol Clear Red (old series). After everything dried I just needed to glue all parts together.
Cable connecting swords handle and pouch was painted with primer paint and then with highly thinned Vallejo Black (950) Model Color. After this dried cable was painted with Tamiya’s Smoke (X-19). "The Eye" was painted with Humbrol Clear Red (old series). After everything dried I just needed to glue all parts together.


