Chciałem przedstawić prosty sposób na zrobienie podstawki pod nasz model.
I wanted to show you a simple way to make a stand for your model.
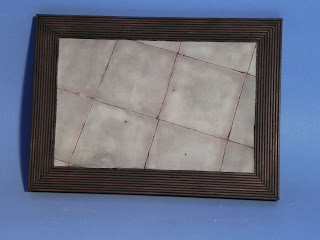
Obecnie w sklepach - nie tylko tych specjalistycznych - można kupić tanie, ładne oprawki do zdjęć.
Currently in stores - not just the specialist ones - you can buy cheap and nice frames for photos.
Oprawki przedstawione na tym zdjęciu były kupione w sklepie Tesco, ale podobne można nabyć też w IKEA oraz innych sklepach.
Frames shown in this picture were bought in Tesco store, but similar can be purchased also at IKEA and other stores.
Pracę nad podstawką rozpoczynamy od wyjęcia szybki oraz usztywniającego tyłu. Następnie musimy się zastanowić, czy chcemy podstawkę płaską czy podwyższoną. Jeśli zdecydujemy się na niską - wystarczy jej wnętrze czymś wypełnić np. balsą.
I begin work on the base by removing fasts and stiffening from the rear of the frame. Then we have to consider whether we want to stand flat or elevated. If we decide to do a low stand. We need something to fill the interior, balsa wood is easy to cut and it’s light.
Następnie wystarczy wykonać podłoże takie, jakie chcemy, całość pomalować i podstawka gotowa.
Then simply need to make the ground work paint it and the stand is ready.
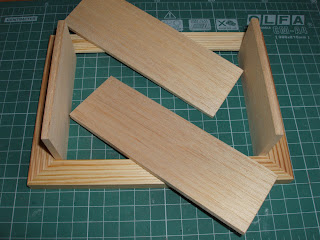
W przypadku, gdy chcemy podwyższoną podstawkę musimy wykonać ścianki podwyższenia. W tym celu wykorzystuję balsę, którą trzeba pociąć na długości wymiarów wewnętrznych ramki. Wysokość zdecyduje o tym, jak mocno podwyższoną będziemy mieli podstawkę.
If we want to make a raised stand we have to do the wall of the stand. For this purpose I use balsa wood which I cut the length of the internal dimensions of the frame. The height of those elements will decide on height of the stand.
Następnym krokiem jest ścięcie krawędzi pod kątem, co najmniej 45 stopni.
The next step is to cut the edges at an angle of at least 45 degrees.
Następnie umieszczamy je wewnątrz podstawki. Ze względu na to, że balsa jest miękka, narożniki zabezpieczam przy użyciu sztywnego papieru, a następnie całość ściągam gumką.
Then we place them inside the base. Due to the fact that balsa is soft I protected the corners by using stiff paper and I use rubber band to keep it tight together.
Teraz kleimy miejsce łączenia od wewnątrz przy użyciu kleju do drewna - najlepiej jest użyć takiego, który schnąc się kurczy, a po wyschnięciu jest sztywny. Dzięki temu bardzo rzadko powstają szpary.
Now we need to glue the binding site from the inside with wood glue - it is best to use one which shrinks and stiffens when it dries. Thanks to that very rarely any cracks appear.
Po wyschnięciu kleju zdejmujemy gumkę i wypełniamy szczeliny - jeśli jakieś powstały - oraz szlifujemy, jeśli jest to potrzebne. Ostatnim krokiem jest pomalowanie naszej podstawki. Jeśli chcemy ją dodatkowo wzmocnić, możemy wkleić trójkątne narożniki, które nie tylko całość usztywnią, ale też ułatwią wypełnianie wnętrza podłożem.
When the adhesive dries we remove the rubber band. We now fill any cracks if any appeared and the grind it if needed. The last step is to paint our stand. If we want to further strengthen it, we can glue triangular corners that not only stiffen the whole thing, but they will also help fill the interior.
A o to przykład tak wykonanej podstawki z wysokimi bokami.
And here is an example of such a base that is elevated.


Brak komentarzy:
Prześlij komentarz